사용된 HTML

<!DOCTYPE html>
<html lang="ko">
  <head>
    <meta charset="UTF-8" />
    <meta http-equiv="X-UA-Compatible" content="IE=edge" />
    <meta name="viewport" content="width=device-width, initial-scale=1.0" />
    <script defer src="main.js"></script>
    <link rel="stylesheet" href="main.css" />
    <title>JS practice</title>
  </head>
  <body>
    <div class="btns">
      <button id="id_button">ID</button>
      <button class="class-button">CLASS</button>
      <button class="class-button">CLASS2</button>
      <button class="class-button">CLASS3</button>
    </div>
  </body>
</html>

기본적인 이벤트 핸들러 등록하는 방법

1. 자바스크립트에서 onclick 함수 이용하기

const helloBtnById = document.getElementById("id_button");

helloBtnById.onclick = () => {
  console.log("ID"); //ID출력
};

2. HTML에서 onclick 속성으로 추가하기

<button id="id_button" onclick="console.log('ID')">ID</button>

값: id버튼을 세번눌렀습니다.

함수로 이벤트 핸들러 다루기

사용된 HTML

<!DOCTYPE html>
<html lang="ko">
  <head>
    <meta charset="UTF-8" />
    <meta http-equiv="X-UA-Compatible" content="IE=edge" />
    <meta name="viewport" content="width=device-width, initial-scale=1.0" />
    <link rel="stylesheet" href="main.css" />
    <script defer src="main.js"></script>
    <title>JS practice</title>
  </head>
  <body>
    <div>
      <button class="button-red">Hello</button>
      <button class="button-blue">Hello2</button>
    </div>
  </body>
</html>

1. element.addEventListener("type", callback)

이벤트 추가하기, callback 부분은 콜백함수를 의미한다.

예시:

const btn_1 = document.querySelector(".button-red");
const btn_2 = document.querySelector(".button-blue");

btn_1.addEventListener("click", () => {
  console.log("hello");
});

2. element.removeEventListener("type", callback)

이벤트 삭제하기, 이벤트를 지우기 위해서는 callback함수의 이름을 알아야한다. 만약 위 예제와 같이 익명함수로 사용한다면 함수에 접근할 방법이 없기 때문에 이벤트를 삭제할 수 없다.

const btn_2 = document.querySelector(".button-blue");

const handleEvent1 = () => {
  console.log("hello");
};

btn_1.addEventListener("click", handleEvent1); // 첫번째 이벤트 등록

btn_2.addEventListener("click", () => {
  btn_1.removeEventListener("click", handleEvent1); //두번째 버튼 클릭 시 첫번째 버튼 이벤트 삭제
});

이벤트 한번만 실행시키기

이벤트를 한번만 실행시키고 싶다면 ,{once:true}를 추가하면 된다.

const btn_1 = document.querySelector(".button-red");
const btn_2 = document.querySelector(".button-blue");

btn_1.addEventListener("click", () => {
  console.log("hello");
}, {once : true});

사용된 HTML

<!DOCTYPE html>
<html lang="ko">
  <head>
    <meta charset="UTF-8" />
    <meta http-equiv="X-UA-Compatible" content="IE=edge" />
    <meta name="viewport" content="width=device-width, initial-scale=1.0" />
    <script defer src="main.js"></script>
    <link rel="stylesheet" href="main.css" />
    <title>JS practice</title>
  </head>
  <body>
    <div class="btns">
      <button id="id_button">ID</button>
      <button class="class-button">CLASS</button>
      <button class="class-button">CLASS2</button>
      <button class="class-button">CLASS3</button>
    </div>
  </body>
</html>

1. element.children

선택된 요소의 자식요소 지정

리턴값이 HTMLCollection 배열이라 index를 통해서 접근이 가능하다.

const btns = document.querySelector(".btns");

console.log(btns.children); //HTML Collection
console.log(btns.children[1]); //자식요소중 두번째 ID
console.log(btns.children[2]); //자식요소중 세번째 CLASS


2. element. firstElementChild

선택된 요소의 첫 번째 자식요소 지정

3. element.lastElementChild

선택된 요소의 마지막 자식요소 지정

const btns = document.querySelector(".btns");

console.log(btns.firstElementChild); //첫번째 자식요소 ID
console.log(btns.lastElementChild); // 마지막 자식요소 CLASS3


4. element.parentElement

선택된 요소의 부모요소 지정

const btns = document.querySelector(".btns");

console.log(btns.parentElement); //부모 요소 지정 body


5. element previousElementSibling

선택된 요소의 형제요소 중 앞에 있는 요소

6.element.nextElementSibiling

선택된 요소의 형제요소 중 뒤에 있는 요소

const btns = document.querySelector(".btns");

console.log(btns.previousElementSibling); // null
console.log(btns.nextElementSibling); // script
const btns = document.querySelector(".btns");

console.log(btns.children);
console.log(btns.lastElementChild);
console.log(btns.firstElementChild);
console.log(btns.parentElement);
console.log(btns.previousElementSibling);
console.log(btns.nextElementSibling);

총 출력값

주요 요소 노드 프로퍼티

1. element.InnerHTML

요소 내부의 HTML 코드를 문자열로 리턴

HTML자체를 변경할 때 주로 사용된다.

const helloBtnById = document.getElementById("id_button");

helloBtnById.innerHTML = "<button>NEWID</button>";

출력값:

2. element.outerHTML

요소 노드 자체의 전체적인 HTML 코드를 문자열로 리턴

새로운 값을 할당하면 요소 자체가 바뀐다.

const helloBtnById = document.getElementById("id_button");

helloBtnById.outerHTML = "<div>NEWID</div>";

출력값:


3. element.textContent

HTML을 제외한 텍스트만을 리턴한다.

텍스트만 다루기 때문에 HTML을 바꿀수는 없다.

const helloBtnById = document.getElementById("id_button");

helloBtnById.textContent = "<div>NEWID</div>";

출력값:

새로운 요소 노드 다루기

자바스크립트에서 요소 노드를 새롭게 추가/수정/이동/삭제를 할 수 있다.

새로운 요소 만들기: document.createElement("태그이름")

요소 수정하기: element.textcontent, element.innerHTML, element.outerHTML

요소를 이동 혹은 추가하기:

1. parentElement.prepend(newElement) 자식 노드의 맨 앞에 추가

2. parentElement.append(newElement) 자식 노드의 맨 뒤에 추가

3. element.before(newElement) 요소의 앞에 추가

4. element.after(newElement) 요소의 뒤에 추가

요소 삭제하기: element.remove();


요소에 속성 추가하기: element.setAttribute("속성이름", "값")

요소의 속성 가져오기: element.getAttribute("속성이름");

요소의 속성 삭제하기: element.removeAttribute("속성이름");


class 이름 바꾸기: element.className = "바꿀값"

classList로 값 추가/삭제:

1. element.classList.add("추가할 값")

2. element.classList.remove("삭제할 값")


요소 추가하기 예시

const btns = document.querySelector(".btns");

const newButton = document.createElement("button");
newButton.textContent = "newbutton";
newButton.setAttribute("class", "class-button");

btns.append(newButton);

출력값:


사용된 HTML

<!DOCTYPE html>
<html lang="ko">
  <head>
    <meta charset="UTF-8" />
    <meta http-equiv="X-UA-Compatible" content="IE=edge" />
    <meta name="viewport" content="width=device-width, initial-scale=1.0" />
    <script defer src="main.js"></script>
    <link rel="stylesheet" href="main.css" />
    <title>JS practice</title>
  </head>
  <body>
    <button id="id_button">ID</button>
    <button class="class-button">CLASS</button>
    <button class="class-button">CLASS2</button>
    <button class="class-button">CLASS3</button>
  </body>
</html>

1. id 속성 이용하기

id에 해당하는 태그 하나만 지정함

사용법: document.getElementById(아이디이름: string): return HTML

const helloBtnById = document.getElementById("id_button");
console.log(helloBtnById); //HTML의 id태그 출력

출력값

잘 보이도록 CSS도 추가했습니다. 


2. class 속성 이용하기

같은 이름의 class 속성이 포함된 모든 값

사용법: document.getElementByClassName(클래스이름:string) : class에 해당하는 태그 모음(HTMLCollection)

const helloButton = document.getElementsByClassName("class-button");

console.log(helloButton);

출력값

3. HTML태그 이름으로 가져오기

사실상 자주 이용 되지 않는다.

사용법: document.getElementByTagName(태그이름: string): tag에 해당하는 태그 모음(HTMLCollection)


4.css선택자로 태그 선택하기

//main.css
#id_button {
  color: red;
}

button.class-button {
  color: blue;
}

4.1 하나만 선택하기

사용법: document.querySelector(css: string):css선택자 해당하는 태그 중 가장 첫 번째 태그 하나

4.2 모두 선택하기

사용법: document.querySelector(css: string):css선택자에 해당하는 태그 모음(NodeList)

const helloButton2 = document.querySelector(".class-button");
const helloButtons = document.querySelectorAll(".class-button");

console.log(helloButton2);
console.log(helloButtons);

출력값:

마무리

const helloBtnById = document.getElementById("id_button");
const helloButton = document.getElementsByClassName("class-button");
const helloButton2 = document.querySelector(".class-button");
const helloButtons = document.querySelectorAll(".class-button");

console.log(helloBtnById);
console.log(helloButton);
console.log(helloButton2);
console.log(helloButtons);

자바스크립트에서 HTML의 속성을 이용해서 태그에 접근하는 방법을 알아보았다. 이전에 했던것이지만 리액트를 쓰고 난 후 많이 까먹은 것 같아 다시 적어본다.

'JS' 카테고리의 다른 글

[JS] 이벤트 처리하기  (0) 2023.04.21
[JS] 요소 다루기 정리  (0) 2023.04.21
[JS]모듈(Module) 모듈화(Modularization)/ Import/Export  (0) 2023.04.06
[JS] 다양한 배열 메소드  (0) 2023.04.06
[JS] 에러 객체와 try catch문  (0) 2023.04.05

ES2015에 등장

모듈: 기능단위로 나눠진 독립적이고 재사용가능한 소프트웨어 덩어리/ 모듈은 단지 파일 하나의 파일에 불과합니다. 즉 스크립트 하나가 모듈 하나입니다.

모듈화: 공통된 기능이나 특별한 목적에 따라 각각의 파일 별로 분리시키는 과정


모듈이 필요한 이유

한 개발자가 1만 줄 이상의 코드를 작성했다고 가정해 보자.

이걸 하나의 파일에서 관리하고 협업에서 사용해야 한다면 벌써부터 아찔해진다.

이 개발자를 제외한 다른 개발자들은 1만 줄의 코드를 해석하느라 시간을 낭비하게 된다.

또한 파일 하나로 모든 기능을 관리하기 때문에 부분적인 기능을 재사용하기에는 거의 불가능에 가깝다.

이런 문제점을 해결하는 데 필요한 것이 바로 모듈화다.


모듈 파일의 조건

모듈 파일의 독립적인 스코프(모듈 스코프)를 가져야 합니다.

이게 무슨 소리냐면 모듈 내에 존재하는 변수나 함수는 모듈 스코프 내에서만 활용이 가능해야 한다는 말이다.

main.js

const num = 123; // main.js 파일에 변수 선언

other.js

console.log(num) // 123 같은 폴더 내의 other.js 파일에서 실행해도 정상적으로 실행됨

이걸 방지하려면 HTML에서 자바 스크립트를 불러올 때 type 속성에 module 값을 추가하면 됩니다.

<script type="module" src="main.js"></script>
<script type="module" src="other.js"></script>


자바 스크립트에서는 import와 export를 사용해서 다른 모듈을 불러와 불러온 모듈에 있는 함수를 호출하는 것과 같은 기능 공유가 가능합니다.

export

Named exports

Named exports는 여러 값을 내보내는데 유용합니다.

export 된 이름을 사용해 import 합니다.

const num = 12345;
export const arr = [1, 2, 3, 4, 5]; // 개별로 export

function print(value) {
    console.log(value)
}

export {num, print}; // 묶어서 export


Default Exports

모듈 당 한 개만 선언할 수 있습니다.

딴 변수 함수 통틀어 하나만 default export 할 수 있기 때문에 기능의 "메인"을 내보내는 것이 좋습니다.

function sum(a,b) {
    return a + b
}

export default sum;


import

모듈 전체 가져오기

import * as members from './other.js'; // *를 와일드 카드 문자라고함


하나 이상의 멤버 가져오기

import {num, print, arr} from './other.js';


다른 이름으로 멤버 가져오기

import {num as numbers, print, arr} from './other.js';


default export 값 가져오기

import sum from './other.js'; // {}중괄호는 쓰지않는다

다른 값과 같이 가져올 때, default export 값을 다른 값보다 먼저 써줘야 합니다.

import sum, {num as numbers, print, arr} from './other.js';
import sum, * as members from './other.js';


'JS' 카테고리의 다른 글

[JS] 요소 다루기 정리  (0) 2023.04.21
[JS] 자바스크립트 태그 선택하기  (0) 2023.04.20
[JS] 다양한 배열 메소드  (0) 2023.04.06
[JS] 에러 객체와 try catch문  (0) 2023.04.05
[JS] 구조 분해(Destructuring)  (0) 2023.04.05

pop

배열의 마지막 요소를 제거한다. 제거된 요소는 변수로 저장할 수 있다.

let myArray = [1, 2, 3, 4, 5];

const popped = myArray.pop();

console.log(popped); // 5
console.log(myArray); // [1, 2, 3, 4]


push

배열의 마지막에 n개의 요소를 추가한다.

let myArray = [1, 2, 3, 4, 5];

myArray.push(6,7,8);

console.log(myArray); // [1, 2, 3, 4, 5, 6, 7, 8]


concat

두 개 이상의 배열을 합치고 복사한다.

let myArray = [1, 2, 3, 4, 5];
let otherArr = [6, 7, 8]

const newArr = myArray.concat(otherArr);

console.log(newArr); // [1, 2, 3, 4, 5, 6, 7, 8]
console.log(myArray); // [1, 2, 3, 4, 5]


join

배열을 문자열로 반환한다.

아규먼트로 구분자(separator)를 넣는다.

let myArray = ['apple', 'banana', 'orange', 'grape'];

let newStr = myArray.join(' '); // 공백추가

console.log(myArray.join()); // apple,banana,orange,grape
console.log(newStr); // apple banana orange grape


split

문자열을 배열로 변환한다. 두번째 아규먼트로는 몇 개를 자를 것인지 정한다.

let str = '1, 2, 3, 4, 5';

const newArr = str.split(); // 구분자를 넣지 않으면 문자열 한덩어리를 배열의 아이템 1개로 들어간다.

console.log(newArr); // ['1, 2, 3, 4, 5']
let str = '1, 2, 3, 4, 5';

const newArr = str.split(','); // 구분자 기준으로 쪼개짐

console.log(newArr); // ['1', '2', '3', '4', '5']
const newArr = str.split(',', 2);

console.log(newArr); // ['1', ' 2']


splice

배열의 원래 요소를 삭제하거나 삭제 후에 추가한다. 반환 값은 삭제한 요소의 배열이다.

배열.splice(자르기 시작할 index, 지울 요소 개수, 대체할 요소);
let myArray = [1, 2, 3, 4, 5];

myArray.splice(0, 2);

console.log(myArray); // [3, 4, 5]
myArray.splice(0, 2, 12,34);

console.log(myArray); // [12, 34, 3, 4, 5]


slice

원하는 요소를 새로운 배열로 추출한다. 원래의 배열은 수정되지 않고 새로운 배열로 복제된다.

let myArray = ['apple', 'banana', 'orange', 'grape'];

//마지막 인덱스 아규먼트가 없으면 시작 인덱스부터 끝까지 추출된다.
console.log(myArray.slice(1,3)); // banana,orange
console.log(myArray); // apple banana orange grape


forEach

배열의 요소를 하나씩 살펴보면서 반복작업한다. 리턴값은 void라 map메서드를 사용하는 일이 더 많다. 콜백함수를 첫 번째 아규먼트로 받는다. (index와 array는 생략가능)

배열.forEach((element, index , arr) => {}); // 요소, 인덱스, 배열 순으로 아규먼트를 받는다.
let myArray = [1, 2, 3, 4, 5];

for (let value of myArray) {
    console.log(value);
}
console.log('----------------')
myArray.forEach((element) => {
    console.log(element);
}); // 위의 for문과 똑같이 작용하는 것을 알 수 있음.

결괏값


map

forEach함수와 작동하는 방식이 비슷하다. 콜백함수의 리턴값을 모아 새로운 배열을 만든다. 원배열에는 영향을 끼치지 않는다.

배열.map((element,index,arr) => {}
let myArray = [1, 2, 3, 4, 5];

const newArr = myArray.map((element) => { 
    return element + 5
})

console.log(myArray); // [1, 2, 3, 4, 5]
console.log(newArr); // [6, 7, 8, 9, 10]


filter

배열의 모든 요소들을 돌면서 콜백함수에 반환된 값이 true가 나오는 모든 요소를 모아 새로운 배열로 반환한다.

배열.filter((element, index, arr) => {})
const myArray = [5, 10, 15, 20, 25];

const filteredNumbers = myArray.filter((number) => {
    return number >= 10;
});

console.log(filteredNumbers); // [10, 15, 20, 25]


find

배열 내 모든 요소들을 돌면서 콜백함수에 반환된 값이 true가 나오면 그 즉시 코드를 종료하고 값을 반환한다.

배열.find((element, index, arr) => {})
const myArray = [5, 10, 15, 20, 25];

const findedNumbers = myArray.find((number) => {
    return number >= 10;
});

console.log(findedNumbers); // [10]


some

모든 배열을 돌면서 콜백함수 조건을 하나라도 만족하면 true를 리턴하고 반복을 종료한다.

배열.some((element, index, arr) => {})
const myArray = [5, 10, 15, 20, 25];

const bool = myArray.some((number) => {
    console.log(number); // 5, 10까지만 출력됨
    return number >= 10;
});

console.log(bool); // true


every

some과 반대되는 개념이다. 모든 배열을 돌면서 콜백함수 조건을 모두 만족하면 true를 리턴하고 반복을 종료한다. 반대로 하나라도 false를 반환하면 false를 리턴하고 반복이 종료된다.

배열.every((element, index, arr) => {})
const myArray = [5, 10, 15, 20, 25];

const bool = myArray.every((number) => {
    console.log(number); // 5, 10, 15까지만 출력됨
    return number < 15;
});

console.log(bool); // false


reduce

원하는 시작점부터 모든 배열을 돌면서 값을 누적한다.

배열.reduce((prev,curr,curI,arr) => {},0)
//처음값, 현재값, 현재 인덱스, 배열

처음값(prev)은 생략하면 두 번째 아규먼트(curr)이 처음값으로 설정된다. reduce메소드의 두번째 아규먼트는 가장 처음 값을 할당하고 없다면 1을 자동으로 할당한다. 처음값에는 리턴 값을 반복적으로 할당하고 현재값에는 배열의 요소를 반복하여 할당받는다. (reduceRight는 반대에서 시작한다.)

const myArray = [5, 10, 15, 20, 25];

const sum = myArray.reduce((prev,curr) => {
    console.log(`prev: ${prev}`);
    console.log(`curr: ${curr}`);
    const acc = prev + curr;
    console.log(`acc: ${acc}
    `);
    return acc;
},0);

console.log(sum);

sort

배열의 순서를 정렬한다. 아무 값도 전달하지 않으면 유니코드를 기준으로 정렬한다. 해당 배열 자체를 바꾼다.


배열.sort();
const myArray = [10, 24, 115, 34, 264];

const sortedArr = myArray.sort();

console.log(sortedArr); //[10, 115, 24, 264, 34]

위처럼 유니코드를 기준으로 정렬하기 때문에 오름차순이나 내림차순으로 정렬하려 할 때 오류가 발생할 수 있다.

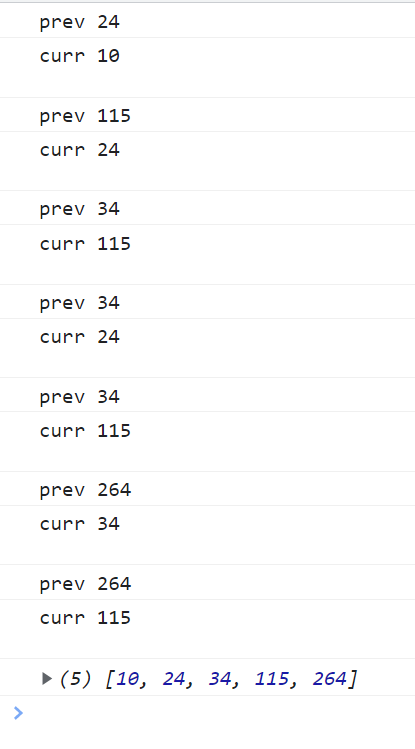
sort의 첫 번째 아규먼트는 콜백함수로 콜백함수의 아규먼트는 보통 앞의 값과 다음값으로 정해진다.

const myArray = [10, 24, 115, 34, 264];

const sortedArr = myArray.sort((a,b) =>{
    console.log(`prev ${a}`);
    console.log(`curr ${b}
    `);
    return a-b;
});

console.log(sortedArr);

콜백 함수 내의 a - b가 음수라면 앞의 값(prev)을 반환하고 양수라면 뒤의 값(curr)을 반환한다. 따라서 a - b를 반환하면 오름차순으로 정렬되고 b - a로 반환하면 내림차순으로 정렬된다.

reverse

해당 배열의 순서가 뒤집힌다. 새로운 배열 생성이 아닌 원래 배열에 덮어쓴다.

const myArray = [1, 2, 3, 4, 5];

myArray.reverse();
console.log(myArray); // [5, 4, 3, 2, 1]


마무리

자주 사용되지는 않는 배열 메서드들이 많아 까먹을 것 미리 정리해 보았습니다. 앞으로는 이 페이지를 자주 들릴 것 같네요.

+ Recent posts